We all want our students to be competent rhythm readers by the time they head off to secondary music. How can we keep rhythm reading fresh and exciting for our students? Check out the presentation below to get lots of purposeful and practical ideas that will have your students engaged and learning!
If you are like me, you have a wide diversity of students as far as how they think, process, and behave. The fancy term for this is neurodiversity. I presented on neurodiversity at The Music Crew virtual conference in July, mainly focusing on autistic students and people with CI. If you have these students in your music class or have a self-contained music class, this presentation is for you!
Please note: I used the term neurodiverse throughout the presentation, but avoided the terms neurodivergent/neurotypical because I was unsure if they were still considered appropriate. As of this writing, they are still used, so I apologize for any confusion.
Neurodivergent would refer to people with ADHD, ASD, CI, etc.
Neurotypical would be people without those divergent thinking patterns.
I have also learned since recording this that autistic people prefer to use the term "autistic" instead of "people with autism," so please know that if I ever present on this again, I will make those changes! It's always good to learn and grow!!
Here is a handout to help you if you like taking notes or want to look up the resources mentioned.
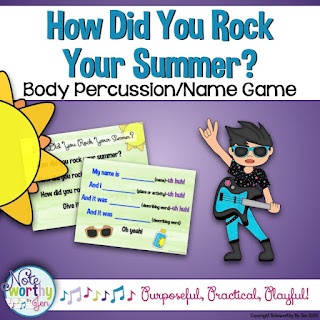
One of the biggest challenges for music teachers is to learn the names of all of their students. I have taught anywhere from around 300 to 1,000 students per year. While I LOVE getting to know all of these students, learning their names can be quite a challenge--especially if you are a new to a school.
So here are some tips:
1. Learning their names is worth it.
The first step to learning names is knowing your efforts are worth it. If we don't take the time to learn their names, why should they take the time to listen to what we have to say? Learning names is part of investing in who they are.
2. Have visual reminders.
I have popsicle sticks with each students name on it and put them in cups grouped by class. This is an easy way to see their name when you pull a popsicle stick for someone to take a turn during class. Writing out a seating chart with first and last names is also helpful.
3. Play name games.
There are lots of great name games out there. Some just use their name once, while others use their names with more repetition. If the name is only used once, I say their name over and over in my head trying to memorize it while the rest of the class is singing.
4. Say their names as they enter.
At the beginning of the school year, I say each child's name as they enter. They know they are supposed to correct me if I get it wrong. I work on pronunciations until I get them the best I can.
5. Take a picture.
If I am stuck on a student's name, I take a picture of them with their name written on the board behind them, or I have them write it on a piece of paper and hold it in front of them. In fact, I have all second graders write their names and take a picture of them to practice. It's smart to do this on a school device to respect the students' privacy. I do mine on an iPad and then delete pictures as I learn them or make a "learn names" folder of the students I'm still working on.
I hope these tips help you have some strategies to learn names. If you are still looking for name games, here's one my upper elementary students enjoy:
I don't know about you, but I want my kids to be able to play instruments if at all possible in the upcoming year! In order to do that, each students will need their own pair of mallets without sharing. I have searched around for the cheapest way to make mallets that I can find. This one can be created for about 40 cents per mallet!
Supplies:
•¼” wooden dowels—pre-cut is nice, though 10” length may be more desirable than 12”. Also, precut doesn't leave a sticker residue behind like you get from buying the longer dowels at a home improvement store. Here's my first try with the lovely sticker residue. No thanks.
•Paint for handles so each class has its own color to grab.
•Vinyl end caps if you cut your own dowels or want a clean look.
Steps to Making Mallets:
Step 1 (optional): Paint the dowels. Though not necessary, they may hold up better when sanitizing if you paint them first. You can also cut them down to around 10" or 10 1/2" if you would like, but that is up to you and the tools you have available to you.
Step 2: Drill 1/4" hole in rubber paint ball. (You may want to use a drill bit that's a tiny bit bigger if you have a hard time getting the dowel into the paint ball.) This is the best part because you get a cool, useless rubber spiral! I just held the paintball and slowly drilled and it worked great! Try to get it as centered as possible or your mallets will look funky at the end.
Step 3: Put a drop of hot glue inside paint ball. (Honestly, mine were snug even without the glue!)
Insert wooden dowel into paintball. It may take you a bit to find the best angle to do this, so practice doing it a few times without the glue. Once you do, it goes quickly.
Step 4 (optional): Use a drop of hot glue to add vinyl end cap.
Your final mallet will look like this:
I based this mallet on one I had that came with an Orff instrument. You will see that if you don't cut the dowels, they will be a bit longer than the ones that come with the instruments. The head of the mallet will also be a bit smaller, but that will make it versatile enough to be used on everything from a glockenspiel to a bass xylophone. Also, I couldn't find a bigger paintball than 0.68 caliber, so this is the biggest size they have.
Frankly, I searched for a mallet head that would hold up and not fall apart when drilled (here's looking at you bouncy balls). Rubber paintballs are the most similar in composition to the original mallet and seem to be much more likely to hold up than anything else I could find. Wanna hear how they sound?
For sanitizing, I'm going to make enough for all of my students in the morning to use their own set. I will sanitize during lunch and have enough for everyone in the afternoon to have their own pair. My current plan is to use this sterisol concentrate that I used to use for recorders and put it in buckets. The company has said you can use it until it becomes cloudy, but I'm going to change it out every week to be safe. I think each bottle makes 4 gallons, but can't remember for sure, so check that out for yourself. I expect it may dye the wooden handles red-ish or weaken the wood, so that may be another great reason to paint handles.
I hope this helps you keep Orff alive in your classroom this year. If you are looking for another way to teach your students about Orff without actually touching instruments (hello, distance learning!), check out this Orff booklet.
Music education will certainly be a challenge to navigate this year. Will we be allowed to sing? Will we be on a cart? Regardless, we will join together to come up with ideas that will work for our students because they need us now more than ever. And, frankly, I need my students too!
I recently presented some non-singing music education ideas at The Music Crew's Virtual Conference 2020. If you missed it and would like a chance to see it, here it is:
It's everywhere in every music classroom--and I'm not talking about teeth. I can't even remember the first student who started doing it in my classroom, but I thank them for introducing me early so I was "educated" when other students began having arms swinging around their hips at maddening speeds that my 36-year-old body cannot even fathom to attempt.
Anyway, rather than fight the phenomenon that is sweeping the world, I thought I would go with it and use it to educate my students.
The Dentist Song (aka--Floss Your Teeth)
1. Tell your students you are going to sing them a "boring" song about going to the dentist. Watch their eyes roll and the groans begin.
3. See several student's eyes light up as they realize where you are really going with this song--and yes, you are going there . . .
4. Have a short discussion about whether the motion for flossing is in sets of 3 or 4. I highly recommend performing the floss in slo-mo saying "Floss, out, across. Floss, out across." Hopefully that will give a few of them a hint that the answer is 3. This is a great time to talk about meter and/or time signatures for a hot second (I don't advise a lengthy discussion at this point because their hips are all itching to floss and they can only pay attention for -0.2 nanoseconds.)
5. Field 20 comments about how your flossing isn't up to snuff in their world. Hint: Do NOT bend your knees while flossing--this was my fatal error when I first began. Also, apparently there is something incorrect with how I hold my wrists, perhaps some PD will teach me how to perfect my floss some day. One can always dream. . .
If you REALLY need help flossing, watch this:
6. Have students floss TO THE BEAT. This a new concept to them. They have been flossing wildly to incorrect meters for a year now, so this may be harder than you think. (Note: Assure kids who can't floss that they won't have to stand up in front of the class, but to do their best. It's best to show them what your first attempt at flossing looked like so they don't feel intimidated.)
7. Have a "floss off" in which all students compete to "floss to the beat" in order to be one of 5 finalists who compete in front of the class. Choose 5 students who can actually floss to the beat to come up front--impressive! (Note: It may take a few times through the song to see the 5 finalists. Something about 28 sets of swinging arms does crazy things to your eyes . . .)
8. Have finalists floss together in front of the class. Classmates get to vote 2 times (this assures everyone should get some votes!).
9. Shower the winner with your admiration. (Note: Also, take a video of their style so next year YOU will be able to win the competition ;)
This music is free for educational use only. Enjoy and share with others! May your hip flexibility improve after teaching this to several classes in a row without a break. Hey, you're tough, you're a music teacher!
Catch you next time I have something noteworthy (or flossworthy)!
Teaching lementary general music is a fabulous opportunity, but if you used to be a band/orchestra/choir director and you get thrown into an elementary position, it can be overwhelming! Here are some thoughts from my 14 years in the elementary music world:
1. You will be okay. The teaching experiences you already have will be beneficial to you! Think about what you want students to know by the time they get to middle school and base your curriculum on that. Also know that younger kids need to first feel/experience a musical concept to put a name with it--if you just put definitions on a board, students aren't going to keep that information well.
2. Go to Orff, Kodály, Music Learning Theory, Dalcroze, or Education Through Music workshops as soon as you can find one near you. Not only will you learn valuable teaching ideas and lessons, you will also network which is imperative for you! You need to have someone to ask questions to!
3. Speaking of Orff, Kodály, and Music Learning Theory--take a levels course for one or more of these during the summer, it will explain so much about elementary music teaching to you. The courses are normally 2 or 3 weeks long, but they are life changing! If you aren't sure which one to take, you can research it. Here's a comparison between Orff and Kodály level 1.
4. Find a curriculum to pull activities fromso you don't have to kill yourself coming up with lesson plans your first year. You may even want to teach the same lessons to K/1, 2/3, and 4/5 so you are only coming up with 3 different lessons each day you see your students instead of 6! There are tons of curriculum options out there--ask in the elementary music teacher page on Facebook to see what other teachers like and why. You will have to find something that fits your style. Teachers Pay Teachers is also an incredible resource for general music teachers! You can find classroom decor, games, movement activities, sub tub supplies, composer of the month/music history, and other resources that will greatly impact your teaching!
5. Your first week of school should be about setting clear expectations and learning names. If you are totally new to this position, it will likely take you 2-3 weeks before you have most names down. It will feel overwhelming at first, but it is worth it and means everything to your students. Find name games on Pinterest and through music teaching blogs. Don't worry about teaching content until you know names!
6. You need to know that kindergarten students are like a bunch of kittens or puppies at the beginning of the school year. Find simple activities such as a few games where they stay in one spot, sing a book to them, or games where they sit. Perhaps create posters for a few classic kid songs (Oh Mr. Sun, Down By the Bay, Old MacDonald, etc.) and sing those with them to help them become comfortable with singing.
7. Use your strengths! If you are a great vocalist, rely on activities that feature your voice. Those with instrumental backgrounds might be more comfortable working on Orff instruments (I recommend Mallet Madness or As American As Apple Pie as a good place to start). Keep in mind KG and 1st grade students won't be able to do much with instruments yet other than learning to hold mallets and keep a beat. If you are a great guitar player, your students will love to do activities while you strum along.
8. Your "go to" elementary music resources (besides Teachers Pay Teachers) will be West Music, Music Is Elementary, and Music In Motion. Check out their catalogs--it may be worth spending a bit of your own money to have less stress in your life, and you will use it for years to come!
There's so much to learn about teaching elementary music, but hopefully those ideas will give you something to think about. I'm sensing that I might need to write on this topic a few more times in the future!
Catch you next time I have something noteworthy!
Please
note: Noteworthy By Jen is an Amazon affiliate. Links may be
monetized to help support the upkeep of this blog. This affiliation
does not influence my honest opinion on book reviews or resource
recommendations.